Table of Contents
Background
At SmartLogic, the majority of applications we've built over the past several years have featured either Phoenix or Rails APIs with web or mobile clients built with React.
React and React Native make it easy to build robust, extensible, and composable user interfaces. When writing applications with React, there are a few libraries and best practices we leverage to quickly and efficiently develop applications to our client's specifications.
This blog post talks about our best practices, essential libraries, and toolchain for building applications using React.
Example
As an example of some of the concepts, we'll use a simple user profile screen (in a single React component) as an example.:
    // app/components/UserProfile/UserProfile.js
    import React, {Component} from "react";
    import PropTypes from "prop-types";

    class UserProfile extends Component {
      static propTypes = {
        email: PropTypes.string.isRequired,
        name: PropTypes.string.isRequired,
        photoUrl: PropTypes.string,
      };

      render() {
        return (
          <div>
            {
              this.props.photoUrl ?
              <img src={this.props.photoUrl} /> :
              null
            }
            <div>
              <p>{this.props.name}</p>
              <p>{this.props.email}</p>
            </div>
          </div>
        );
      }
    }

    export default UserProfile;
At its most basic, a React component takes some properties, or props, and uses its render method to display a view. React also has a way to encode basic types of props using the prop-types library which was, until recently, built into React itself.
This relatively simple component takes three props: name, email, photoUrl, and it displays the profile picture (if there is one) along with the user's name and email.
We'll build on this component in subsequent examples.
Essential Libraries
Redux
Some of the React work we do uses React to add smaller pieces of complex interaction to Rails/Phoenix applications. More often than not though, we're writing full React apps that need a way to manage their own state.
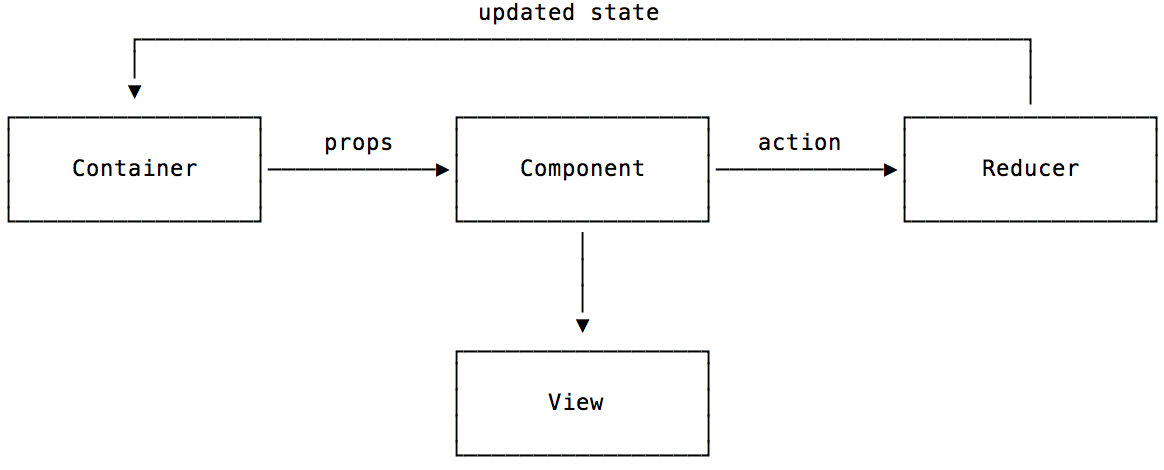
Redux is the de facto state management library for React. Redux was inspired by (but is not an actual implementation of) the Flux architecture pattern proposed by Facebook. There are several important terms to be aware of when discussing Redux:
- State: general application state; distinct from per component state.
- Actions: actions are objects; they have a type and optionally some additional data. They get dispatched by Redux and processed by reducers.
- Reducers: a function that takes state and an action and returns new state calculated from the action.
- Containers: special components that hook a React component up to the Redux store. State and functions to dispatch actions can be selectively passed into the React component as props.
These concepts work together to facilitate one-way data-binding: actions generated in components trigger state changes in reducers. The updated state gets passed to the container where state is selectively passed to the component as props. The component then uses the props to render its view.
Example
Putting these pieces together to have a store for our UserProfile component would add a few new files.
The redux store setup itself:
    // app/lib/store.js
    import {createStore, applyMiddleware} from "redux";

    import user from "./reducers/user";

    const store = createStore(user);

    export store;
A file defining actions and action generation functions:
    // app/lib/actions.js

    export const Actions = {
      FETCH_USER_PROFILE: "FETCH_USER_PROFILE",
      FETCH_USER_PROFILE_SUCCEEDED: "FETCH_USER_PROFILE_SUCCEEDED",
    }

    export function fetchUserProfile(userId) {
      return {
        type: Actions.FETCH_USER_PROFILE,
        userId: userId,
      }
    }

    export function fetchUserProfileSucceeded(payload) {
      return {
        type: Actions.FETCH_USER_PROFILE_SUCCEEDED,
        payload: payload,
      }
    }
A reducer for handling actions related to user data:
    // app/lib/reducers/user.js

    import {Actions} from "../actions";

    const {
      FETCH_USER_PROFILE_SUCCEEDED,
    } = Actions;

    const defaultUserState = {
      email: "",
      id: null,
      name: "",
      photoUrl: null,
    }

    const user = (state = defaultUserState, action) => {
      switch (action.type) {
      case FETCH_USER_PROFILE_SUCCEEDED:
        return Object.assign({}, state, action.payload)
      }
    }

    export user;
And finally, a container component to connect the user profile component to the redux store:
    // app/components/UserProfile/UserProfileContainer.js
    import {connect} from "react-redux";

    import {
      fetchUserProfile,
    } from "../actions";

    import UserProfile from "./UserProfile";

    const mapStateToProps = (state: Object) => {
      return {
        email: state.user.email,
        name: state.user.name,
        photoUrl: state.user.photoUrl,
      };
    };

    const mapDispatchToProps = (dispatch) => {
      return {
        fetchUserProfile: (userId) => {
          dispatch(fetchUserProfile(userId));
        },
      }
    };

    const UserProfileContainer = connect(
      mapStateToProps,
      mapDispatchToProps,
    )(UserProfile);

    export default UserProfileContainer;
Redux Saga
Our preferred library for handling side-effects is redux-saga. redux-saga lets us handle side-effects (e.g., fetching data via AJAX requests or local storage) asynchronously and in an easily-testable manner.
Redux saga is a redux middleware layer – it sits between the points of action dispatching and action handling. Much like reducers, sagas handle actions. Given an action like FETCH_USER_PROFILE, the saga can initiate some effectful computation (making an API request to get the data needed for a user's profile). After the computation resolves (the API request completes with the profile payload), the saga can dispatch a new action for the reducer to handle, FETCH_USER_PROFILE_SUCCEEDED. The reducer can use this action and the profile payload to update the application state with fresh profile data.
Example
A saga to fetch data for this example might look like:
    // app/lib/sagas/user.js

    import {
      call,
      put,
      takeLatest,
    } from "redux-saga/effects";

    // Given a separate file that exports functions to make
    // requests to the API.
    import {fetchUserProfile} from "../api";

    // Given a file that defines actions for the application.
    import {
      FETCH_USER_PROFILE,
      FETCH_USER_PROFILE_SUCCEEDED,
      requestFailed,
    } from "../actions";

    function* fetchProfile({userId}) {
      try {
        const payload = yield call(fetchUserProfile, userId);
        yield put({type: FETCH_USER_PROFILE_SUCCEEDED, payload: payload}));
      } catch (e) {
        yield call(requestFailed, e);
      }
    }

    // Declare saga functions to handle particular actions.
    export default function* profileSaga() {
      yield takeLatest(FETCH_USER_PROFILE, fetchProfile);
    }
We also have to modify the store that we previously set up to insert the saga middleware:
    // app/lib/store.js
    import {createStore, applyMiddleware} from "redux";
    import createSagaMiddleware from "redux-saga";

    import user from "./reducers/user";

    const sagaMiddleware = createSagaMiddleware();

    const enhancer = compose(
      applyMiddleware(sagaMiddleware),
    );

    const store = createStore(user, enhancer);

    export store;
With this, the saga that we defined above is now able to handle actions dispatched by redux.
We can also add a few new props1 and a componentWillMount method to the UserProfile component to fetch the user's profile information when the component mounts:
    class UserProfile extends Component {
      static propTypes = {
        ...
        id: PropTypes.number.isRequired,
        fetchUserProfile: PropTypes.func.isRequired,
      };

      componentWillMount() {
        this.props.fetchUserProfile(this.props.id)
      }

      render() {
        ...
      }
    }
With these pieces in place, we now have a component that can trigger fetching its own data, a function to make the request to the API, and a reducer that will update application state with the API response. Because the component fetches its data with just an id, this component can fetch data for and view any user's profile as long as its props contains an id. This makes it reusable anywhere we want to show a user profile.
Toolchain
ES6/ES2015
ES6 brought many, many features to modern JavaScript. Modern ES6+ syntax lets us write code that is both safer and more readable. The following are some of the ES6+ features that we use most frequently (ES6 syntax is also present in many of the previous examples):
let:letdefines a block scoped local variable. This helps prevent unintended variable redefinition and makes code easier to read.const:constdefines a block scoped constant that, by definition, cannot change.- arrow functions: arrow functions, (e.g.
const square = (x) => x * x) are more readable than traditional function definitions (function square(x) {return x * x}), but they also bind thethisvalue of their defining context. This prevents needing to manually call.bind(this)when calling a function in which you want to do something with the caller'sthis. - class:
ES6 classesare now the preferred2 way to create React components. - destructuring: Another convenient feature from ES6 that makes code more readable is assignment via destructuring of objects and arrays. As an example,
const {x, y} = {x: 5, y: 10, z: 15}assigns15toxand10toy. import/export: import and export allow JavaScript code modularization. Exporting and importing specific functions and definitions from other modules helps with code organization and readability.- generator functions: Redux Saga uses generator functions to asynchronously handle effectful tasks.
Babel
Babel is a flexible JavaScript compiler. With Babel, you can write applications using cutting edge JavaScript features without worrying about whether browser support exists. Babel uses plugins to transform the syntax of your JavaScript into features that are already supported by browsers.
Webpack
Webpack is a module bundler. While webpack configurations can become complex, at its simplest webpack lets you specify a module as an entry point, a file for output, and optional loaders and plugins.
Starting at the entry point, webpack determines the required modules in your application, "compiles" them into a bundle, and writes it to the output file. By default, webpack can only process JavaScript. Webpack uses Loaders to specify how to find and process other types of files (e.g., CSS or SASS, static assets, etc.). Plugins provide an interface for additional functionality like compression (ZopfliWebpackPlugin, CompressionWebpackPlugin) and uglification (UglifyjsWebpackPlugin).
ESLint
ESLint is a JavaScript code linter that can catch syntax/style errors. In addition to its default rules (things like no console statements, no unnecessary semi-colons, no unreachable code), you can also use configurations and plugins from around the wider community such as Airbnb's config and dedicated React and React Native plugins.
Having a set of style rules enforced consistently and automatically at a project-wide level is one of the best ways to ensure consistency and reduce friction when bringing new developers onto a project.
Flow
JavaScript is a dynamically typed language. Flow is a static type checker for JavaScript. There is a lot of debate over the trade-offs between static and dynamic typing in programming languages, but recent research has found that JavaScript static type systems like Flow and TypeScript can (conservatively) reduce the number of bugs in JS projects by 15%3. Catching bugs before they get checked in to a code repository reduces time spent debugging and results in more time spent working on building functionality.
Flow is opt-in, making it easy to add to projects in progress if it was not added at the start. Flow also has sophisticated type-inference, meaning that explicit type annotations4 aren't often necessary for the system to check for type errors. An additional benefit when using Flow with React is that Flow understands React PropTypes and can use them to type check React components (in addition to actual Flow annotations). If React PropTypes are already in use, this reduces the time to getting value out of adding Flow to a React project after the fact.
The official installation guide explains how to add flow to a project, including configuring Babel to remove Flow type annotations to produce valid JavaScript.
Best Practices
Aside from the libraries and toolchain that we think are essential to building extensible, responsive, interactive React and React Native applications, there are a few best practices we follow to get the best performance out of our applications.
Minimize state
A good way to improve performance is by minimizing stateful components. Minimizing state in components makes them more reusable in other parts of an application, and makes them faster because they become just a function from props to a view. With this in mind, React lets us define components just using functions. Because it has no state, we can rewrite the initial UserProfile component we defined using ES6 class syntax with a function:
    // app/components/UserProfile/UserProfile.js
    function UserProfile(props) {
      return (
        <div>
          {props.photoUrl ? <img src={props.photoUrl} /> : null}
          <div>
            <p>{props.name}</p>
            <p>{props.email}</p>
          </div>
        </div>
      )
    }
    export default UserProfile;
This functional component is easier to read and more performant. We can also use features like ES6 destructuring assignment and Flow to make the component type-safe and even easier to read:
    // app/components/UserProfile/UserProfile.js

    // @flow

    type Props = {
      email: string,
      name: string,
      photoUrl: ?string,
    }

    function UserProfile({email, name, photoUrl}: Props) {
      return (
        <div>
          {photoUrl ? <img src={photoUrl} /> : null}
          <div>
            <p>{name}</p>
            <p>{email}</p>
          </div>
        </div>
      )
    }
    export default UserProfile;
Here, we've defined a type Props that has an email, name, and optional photoUrl. Now if we try to use photoUrl without handling the case that it might be null, we will get an error from Flow. We've also destructured props to pull out the actual props that we care about in the component, making their subsequent use more readable.
Reduce unnecessary re-rendering
Another way to improve performance is by avoiding re-rendering components unless strictly necessary. Using the shouldComponentUpdate component lifecycle method defined by extending React.Component, we can manually perform a check to determine if the component needs to update. For components with complex logic, this can be hand rolled with a high degree of flexibility. In the more common case though, when all you would check is whether props and state have changed and block re-rendering if they have not, you can instead extend React.PureComponent. PureComponent does a shallow comparison of state and props for you, reducing the boilerplate of manually writing the shouldComponentUpdate method for these comparisons.
We can also mitigate unnecessary re-rendering by not passing closures as props to components. As an example, let's assume we have a form somewhere for the UserProfile component that lets the user change their name, email, or photo url. We also have a component called CustomInput combining a label and the actual input with some default styling that we're using throughout the app. The CustomInput has a label and a change handler function as its props.
To set state inside the parent component (UserForm), we want to pass a function to the CustomInput component to set state in UserForm. One of the easiest ways to do so is to pass a closure and directly call this.setState:
    class UserForm extends React.Component {
      render() {
        return (
          <div>
            <CustomInput
              label: "Name"
              onChange: {this.changeUserName}
              onChange: {(newName) => {this.setState({nameValue: newName})}}
              />
            ...
          </div>
        )
      }
    }
The problem with this is that every time the UserForm component re-renders, a new anonymous function gets created; this in turn causes the CustomInput component itself (along with any of its own child components) to re-render. We can avoid re-rendering by defining a function inside the parent component that sets the internal state:
    class UserForm extends React.Component {
      render() {
        return (
          <div>
            <CustomInput
              label: "Name"
              onChange: {this.changeUserName}
              />
            ...
          </div>
        )
      }

      changeUserName = (newName) => {
        this.setState({nameValue: newName})
      }
    }
Breaking this function out has the added benefit of making the code more readable.
Conclusion
React and React Native are great frameworks for building custom applications in JavaScript. The community has made an incredible set of tools like Redux, Redux-Saga, and Flow that were either built for or work seamlessly with React. By leveraging these frameworks and tools, we can quickly and efficiently build applications for our clients.
Footnotes
1 We also need to add id to the mapStateToProps function in UserProfileContainer to pass it from the store to the component.
2 React 15.5.0 deprecated React.createClass and extracted it from React into its own package.
3 This provides a good summary of the paper.
4 Explicit annotations can however serve as good documentation for functions and variables.