In yesterday's post I walked through how I got the Flex 4 SDK setup, compiled, and ran the first Hello World application in Flex 4. I said I would follow up today with skinning a Button using the new declarative graphics tags known as FXG (previously referred to as MXML-G), so here we are.
Today I want to explore using the new layout property as well as using a Skin file to describe how the button should look. Let's get started...
This project will have 3 files:
- NewSkinning.mxml - main application containing 2 buttons
- MyButtonSkin.mxml - first custom button skin
- OtherSkin.mxml - circular button skin
NewSkinning.mxml
UPDATE: Removed xmlns:mx="library:adobe/flex/halo" and changed <mx:Style> to <Style> as pointed out by Peter.
<?xml version="1.0" encoding="utf-8"?>
<Application xmlns="http://ns.adobe.com/mxml/2009"
layout="flex.layout.VerticalLayout"
backgroundColor="gray">
<Style>
Button { skinZZ: ClassReference("MyButtonSkin"); }
.otherButton { skinZZ: ClassReference("OtherSkin"); }
</Style>
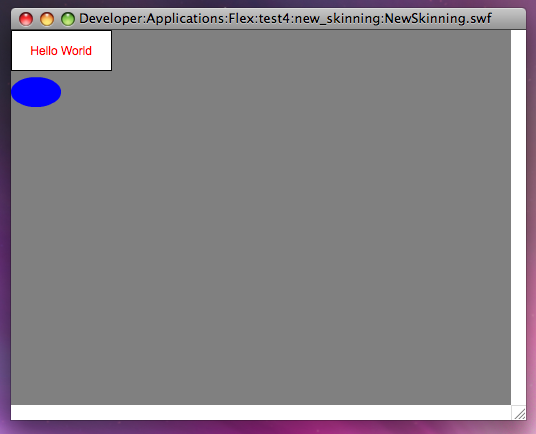
<Button label="Hello World" />
<Button styleName="otherButton" label="Hello World 2" />
</Application>
Two things to note here are that you cannot include two language namespaces in the same file. If you replace "library:adobe/flex/halo" with "http://www.adobe.com/2006/mxml" you will get an error when trying to compile the application:
/Developer/Applications/Flex/test4/new_skinning/NewSkinning.mxml(5): col: 28
Error: Only one language namespace must be specified per document.
Found 'http://ns.adobe.com/mxml/2009' and 'http://www.adobe.com/2006/mxml'.
UPDATE: You can ignore this if you're using the updated code, but I'll leave this in here in case people search for the compiler error above.
Secondly, you'll notice a new attribute from my code from yesterday: layout, which is assigned a new class value. Layout in Flex 4 can be handled separately from the view if you don't want to use absolute positioning. The layout="flex.layout.VerticalLayout" will tell the Application to use the flex.layout.VerticalLayout class to layout the children.
At first, this may not seem like a big deal, since you could define vertical or horizontal layout in an Application in Flex 3, but this now carries through to all classes, and it is easy to simply write a new layout class and assign that to the layout property if you want to write some custom layout code yourself. Notice the skinZZ property in the CSS is used to assign the view class for the Button components. Now let's check out the Skin files.
MyButtonSkin.mxml
<?xml version="1.0" encoding="utf-8"?>
<Skin xmlns="http://ns.adobe.com/mxml/2009">

    <states>
        <State name="up" />
        <State name="over" />
        <State name="down" />
        <State name="disabled" />
    </states>

    <content>

        <Rect left="0" right="0" top="0" bottom="0" minWidth="100" minHeight="40">
            <stroke>
                <SolidColorStroke color="0x020202" color.over="0xFF00FF" />
            </stroke>
            <fill>
                <SolidColor color="white" color.over="gray" color.down="0xFF0562" />
            </fill>
        </Rect>

        <TextBox text="{data.label}" fontFamily="Arial" fontSize="12"
                 color="0xFF0000" color.disabled="0xC0C0C0"
                 color.over="0x0000FF" color.down="0x00FF00"
                 left="10" right="10" top="4" bottom="2"
                 textAlign="center" verticalAlign="middle" />

    </content>

</Skin>
OtherSkin.mxml
<?xml version="1.0" encoding="utf-8"?>
<Skin xmlns="http://ns.adobe.com/mxml/2009">

    <states>
        <State name="up" />
        <State name="over" />
        <State name="down" />
        <State name="disabled" />
    </states>

    <content>
        <Ellipse width="50" height="30">
            <fill>
                <SolidColor color="blue" color.over="red" color.down="white" />
            </fill>
        </Ellipse>
    </content>

</Skin>
Compile and run the app and you should see:
NOTE: If you are on Windows and having problems compiling, look at the comment that Sherif left in my previous post.